 Iqbal Abdullah
How to Create Email With Custom Domain Names, From DNS to Inbox
The three ways to get email on your own domain, and a tested walkthrough from MX
Talking to people around me, when they get a business card with a @gmail.com email address on it they tell me they can't help but put their new acquaintance through the filter: "Is this person serious about what they are doing?" They remain polite, but that doubt was planted.
OK, so how do you get your own email with a custom domain name? That is why we built KaiMail.
If you want to create email with custom domain names, you have three options. I will show you all of them, then walk through the cheapest and fastest one step by step. At the end you will have a working address on your own domain, plus the DNS records that keep it out of spam folders.
What You Need Before You Start
You do not need much. A domain name you own, a login to wherever its DNS records live, and an existing inbox where you already read mail.
Your registrar and your DNS provider can be different companies. I buy domains through a standard registrar, but I manage the DNS records in Cloudflare because the dashboard is faster. That is fine. You just need to know which website to open when someone says "add an MX record." If you are not sure, look for a page called DNS, Name Servers, or Manage Domain.
You also need to decide whether to receive mail on the root domain or a subdomain. Most people use the root domain, which means your address looks like [email protected]. A subdomain gives you [email protected]. The setup steps are almost identical, but the record values change slightly. Decide between a root domain and a subdomain for email
Finally, be patient. DNS is a distributed database. When you change a record, your edit lands on your provider's servers immediately, but the rest of the internet caches old answers for minutes or hours. I have seen changes visible in thirty seconds and I have seen them take half an hour. If something does not work right away, wait five minutes before you panic.
Three Ways to Create Email With Your Own Domain
There are three ways to get email on a domain you own. Each has a different cost, a different amount of setup, and a different relationship with your existing inbox.
Option 1: A Full Mailbox Host
This is what most people picture when they think of business email. You sign up for Google Workspace, Microsoft 365, Zoho Mail, or Fastmail. They give you a new webmail inbox, mobile apps, calendars, and contact lists. You log in to their website and send mail from there, or you connect your phone via IMAP.
The upside is polish. Google Workspace feels like Gmail because it is Gmail. Microsoft 365 feels like Outlook because it is Outlook. You get spam filtering, search, and integration with documents and video calls.
The downside is cost and lock-in. You pay per user every month. If you stop paying, you lose the inbox. Migrating away later means exporting mail and retraining everyone.
Option 2: A Forwarding Service and the Inbox You Already Use
This is the second route. You use a forwarding service like KaiMail, Forward Email, Cloudflare Email Routing, or ImprovMX. The service receives mail sent to your domain, then passes it to an address you already check, such as Gmail or Outlook.
The upside is speed and cost. You do not need a new app. You do not need to learn a new interface. Mail lands in the inbox you already open every morning. Many forwarding services have generous free tiers.
The downside is that you are not getting a full mailbox. You are getting a redirect. Some services let you send mail from your domain too, but that usually requires a paid plan or a separate SMTP setup. You also need to understand a little DNS, because you are the one pointing MX records at the service.
KaiMail's free plan covers one domain, one mailbox, three hundred received emails per month, and a one megabyte message size limit. If you upgrade, you get webhooks, multiple forwards, and authenticated SMTP sending so you can reply from your domain address. See the full KaiMail pricing and feature list
Option 3: Email Bundled With Your Web Host
If you already pay for shared hosting, your provider probably includes email in the same package. cPanel and Plesk both let you create addresses like [email protected] and read them in webmail or via IMAP.
The upside is convenience. One login manages your website and your mail.
The downside is quality. Web hosts are not specialised mail providers. Their IP addresses can end up on block lists because one customer on the same server sent spam. Storage limits are often low. And if you move your website to a new host, you also have to move your email. Finally, if you have never run a mail server of your own before, maybe you do not want to start now.
How to Choose the Right Option
Prices checked 2026-10-06.
| Service | Cost | New Inbox? | Send From Domain? | Setup Effort | Lock-in |
|---|---|---|---|---|---|
| Google Workspace Business Starter | $7/user/month | Yes | Yes | Medium | High |
| Microsoft 365 Business Basic | $6/user/month | Yes | Yes | Medium | High |
| Zoho Mail | Free to $4/user/month | Yes | Yes | Medium | Medium |
| Fastmail Standard | $5/user/month (annual) | Yes | Yes | Low | Medium |
| KaiMail | Free to paid | No | Paid SMTP | Low | Low |
| Forward Email | Free to $3/month | No | Paid SMTP | Low | Low |
| Cloudflare Email Routing | Free | No | No | Very low | Medium |
| ImprovMX | Free to $9/month | No | Paid SMTP | Low | Low |
So what do we actually do?
- If your team lives inside Google Docs or Microsoft Teams, buy the matching mailbox host. The integration is worth the subscription.
- If you care about privacy and want a fast, independent inbox, Fastmail is the best standalone mailbox I have used.
- If you are a solo founder, freelancer, or small team that already lives in Gmail, use a forwarding service. It is the cheapest path and it keeps your mail in one place.
- If you are already locked into a web host and your volume is low, the bundled email might be fine. Keep an eye on deliverability.
Step by Step: Set Up a Custom Domain Address With a Forwarding Service
I am going to walk through KaiMail because it is the service I run and I know exactly what the dashboard looks like. The steps are nearly identical for any forwarding provider.
When I tested this on 6 October 2026, I added a fresh test domain at 14:32 JST. The first test message reached my Gmail inbox at 14:39 JST. Seven minutes, from an empty DNS dashboard to a delivered message.
Step 1: Add Your Domain to the Forwarding Service
Log in to the KaiMail dashboard and click Add Domain. Type your domain name without the www. The system checks that nobody else has already claimed the domain, then adds it to your account. That is the whole step.
You do not prove ownership with a separate TXT record. Pointing the MX record at KaiMail is what proves ownership, because only the owner of a domain can change its DNS. Step 2 sets that record up.
Step 2: Point Your MX Records to the Service
MX records are the postal system of the internet. When someone sends mail to [email protected], their mail server looks up the MX records for yourdomain.com and delivers the message to the server those records point to.
KaiMail gives you one MX record value:
Priority: 10
Value: mail.kaimail.net
Add it as an MX record in your DNS. If your DNS provider has placeholder MX records from a previous host, delete the old MX records first.
Most providers show changes within seconds, but global DNS caches can hold old values for up to the TTL. In practice, expect five to thirty minutes before every mail server on earth sees the new records.
See the exact MX record values for KaiMail
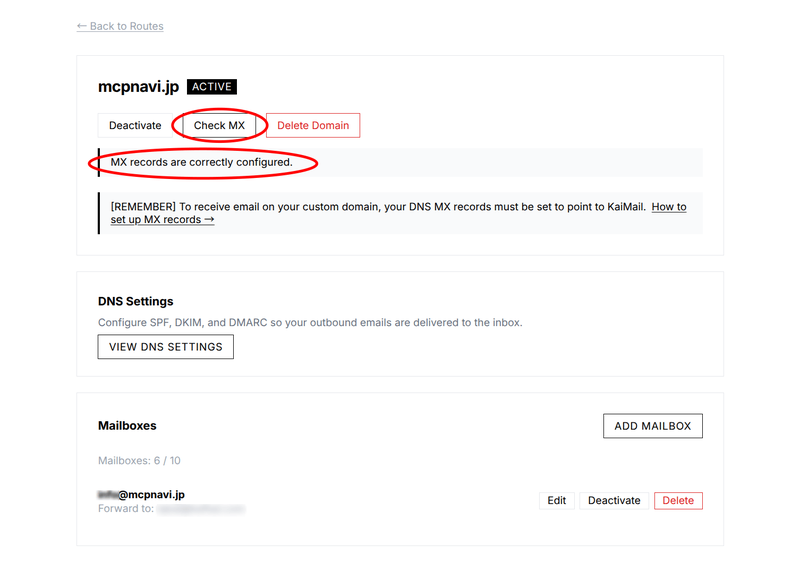
The screenshot below shows you how to check and verify that you MX DNS settings is correctly configured.
Step 3: Add SPF and DKIM Records So Receivers Trust Your Mail
SPF and DKIM are TXT records that help receiving servers decide whether your mail is legitimate. Without them, your messages are more likely to be flagged as spam.
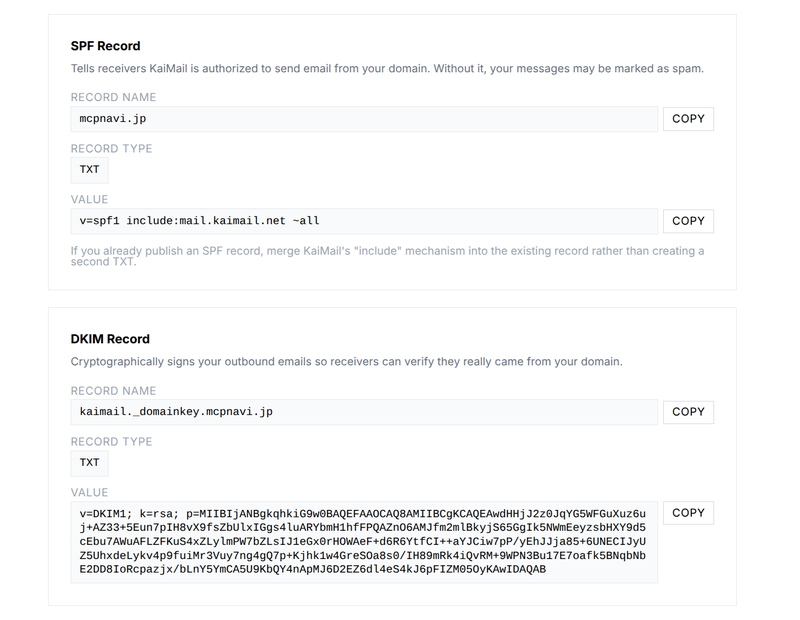
SPF is a list of servers allowed to send mail for your domain. The value looks like this:
v=spf1 include:mail.kaimail.net ~all
The format is defined in RFC 7208.
If you already publish an SPF record for your domain, merge KaiMail's include mechanism into the existing record rather than creating a second TXT record. Two SPF records will confuse receiving servers.
DKIM is a public key. Receiving servers match it against a cryptographic signature attached to each message. The record name is kaimail._domainkey.yourdomain.com. The value is a long string that starts with v=DKIM1; and includes the key. The protocol is specified in RFC 6376.
Paste both records into your DNS exactly as given. Do not add extra quotes or line breaks inside the value. Some providers, especially Amazon Route 53, split long DKIM keys across multiple strings automatically. Others require you to paste it as one continuous block. If your provider throws an error, check the troubleshooting section below.
The screenshot below shows the SPF and DKIM records which you get from your domain dashboard to be registered in your DNS
Step 4: Create the Address and Choose Where It Goes
In the KaiMail dashboard, create an address like [email protected] and set its destination to your existing Gmail or Outlook address. You can create multiple addresses and send them all to the same inbox, or route them to different people.
If you want a catch-all address that receives mail sent to any username at your domain, enable the catch-all setting and point it to your inbox. This is useful for small teams because you do not need to create aliases one by one.
Step 5: Send a Test Message and Read the Headers
Open a different email account, one that is not the destination address, and send a message to [email protected]. Using a different account matters because some providers drop test loops that look like they came from the same sender and receiver.
Wait a minute, then open the forwarded message in Gmail. Click the three dots menu next to the Reply button and choose Show original. You will see a wall of text. Scroll to the section that starts with Authentication-Results. Look for three lines:
spf=passmeans the receiving server checked your SPF record and found the forwarding server on the list.dkim=passmeans the DKIM signature matched your public key.arc=passmeans the forwarding service added a trusted seal that preserves the authentication results even though the message was forwarded. ARC is defined in RFC 8617.
If you see spf=fail or dkim=fail, check that your DNS records are exactly as provided and that you did not accidentally create duplicate SPF records.
Send Email From Your Custom Domain Address
Receiving mail is only half the job. You also want to reply from your domain so the other person sees [email protected] in the From field.
Reply From Gmail With "Send Mail As"
Gmail lets you add external addresses and send through them. Go to Settings, then Accounts and Import, then Send mail as. Add your custom address. Gmail will send a verification code to that address. Since KaiMail forwards it to your Gmail, the code lands in your inbox immediately.
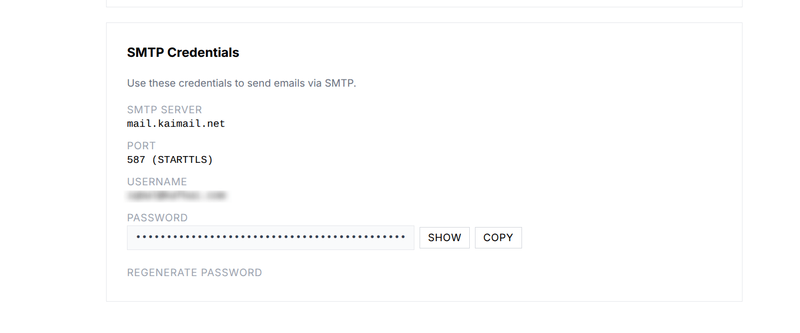
Once verified, set the outgoing server to mail.kaimail.net on port 587 with TLS enabled. Use your KaiMail SMTP credentials. When you compose a new message, you can choose your custom address from the From dropdown.
One warning before you rely on this. Google is retiring it. Starting January 2027, Gmail will no longer send mail from third-party addresses in the web interface or the mobile apps, and Google is already restricting new configurations during the second half of 2026. Google explains the change on its Gmail Help page about third-party email account support. If you want a sending path that outlives the deadline, use the SMTP settings in the next section, or move your sending to a desktop mail client.
Follow the full guide to sending from your custom domain address
Send Through Authenticated SMTP From Any Mail App
Any modern mail app that supports SMTP can send through KaiMail. The settings are standard:
- Server:
mail.kaimail.net - Port:
587 - Encryption: STARTTLS
- Authentication: your KaiMail SMTP username and password
Apple Mail, Thunderbird, and Outlook all support this. The difference from Gmail's Send mail as is that the mail leaves through KaiMail's servers, so your domain's reputation is what matters, not your personal Gmail reputation.
Screenshot below shows the SMTP credentials view accessible from your account in the Dashboard
Keep Custom Domain Email Out of the Spam Folder
Forwarded mail has a reputation problem. When a message arrives at your forwarding service and is passed on to Gmail, Gmail sees that the message came from the forwarding server's IP address, not the original sender's IP. If your SPF record only lists the original sender's server, Gmail might mark the forwarded copy as suspicious.
DKIM helps because it survives forwarding. The signature is inside the message headers, so it travels with the mail. ARC goes further by adding a cryptographic chain that says "this forward was legitimate." Receiving servers that understand ARC can see that the forwarding service verified the original authentication and then re-signed the message.
You do not need to understand every detail. You just need the records in place so that receivers trust your mail. Google's email sender guidelines explain the SPF and DKIM requirements in full.
See why forwarded emails go to spam and how ARC fixes it
Fix the Most Common Setup Problems
Here are the four problems I see most often.
MX changes not yet visible. You added the records, tried sending an email to your new custom domain, and nothing arrived. Wait. Use a tool like dig MX yourdomain.com or an online DNS checker to see what the world sees. You can also check from the KaiMail dashboard. Open your domain's detail page and click the Check MX button. If the record is correct, you will see the message "MX records are correctly configured." If the old records still show up, make another cup of tea and check again in ten minutes.
Old MX records from a previous host still present. This is the silent killer. If you moved from Google Workspace to a forwarding service but left Google's MX records in place, some mail still goes to Google and some goes to the new service. Delete the old ones.
Route 53 "CharacterStringTooLong" error for DKIM. Amazon Route 53 limits TXT record strings to 255 characters. A DKIM public key is longer. You must split the key into multiple quoted chunks inside a single TXT record. Most forwarding services give you the split version, but if you are copying from a generic generator you might hit this wall.
Cloudflare DNS settings for mail records. Cloudflare proxies some records by default. MX and TXT records should never be proxied. Make sure the cloud icon next to your MX record is grey, not orange. An orange cloud means Cloudflare is intercepting the traffic, and mail servers do not know where to deliver.
Frequently Asked Questions
Can I Create a Custom Domain Email Address for Free?
Yes, depending on what you mean by free. Forwarding services like Cloudflare Email Routing and KaiMail's free tier let you receive mail on your domain at no cost. If you also need to send from that address, you usually need a paid plan or a separate SMTP provider. Read our full guide to free business email options
Can I Keep Using Gmail or Outlook?
Yes. That is the whole point of a forwarding service. Mail arrives at your custom address, the service forwards it to your existing Gmail or Outlook inbox, and you read it there. You do not need a second tab.
Do I Need Web Hosting to Have Email on My Domain?
No. Email and web hosting are separate services. Your domain only needs DNS records, which you manage at your registrar or DNS provider. You can have email on a domain that has no website at all.
What Happens to Email Sent to My Old Address?
Nothing changes for mail sent to your old Gmail or Outlook address. Those messages still arrive in the same inbox. Your custom domain address is an additional channel, not a replacement. If you want people to stop using the old address, tell them.