Setting Up Your DNS MX Records
This guide walks you through setting up MX (Mail Exchange) records so your domain's email is handled by KaiMail. The steps apply to any domain registrar or DNS provider — Cloudflare, Namecheap, GoDaddy, Route 53, Porkbun, Hetzner, you name it.
🚨 KaiMail is NOT related to any of the domain registrars above. If you feel unsure about setting up your MX records yourself, we suggest you get in touch with your own registrar and ask for help.
Prerequisites
- A domain you own (e.g.
yourdomain.com) - Access to your domain's DNS management panel
What Are MX Records?
MX records tell the internet which mail server should receive email for your domain. When someone sends an email to [email protected], the sending server looks up your domain's MX records to find out where to deliver it.
Step 1: Open Your DNS Settings
Log in to wherever your domain's DNS is managed. This is usually your domain registrar (where you bought the domain) or a third-party DNS provider if you've pointed your nameservers elsewhere.
Look for a section labeled DNS, DNS Management, DNS Records, Zone Editor, or similar.
Step 2: Remove Existing MX Records
Before adding new records, delete any existing MX records for your domain. Having leftover MX records from a previous email provider will cause delivery issues — mail may be routed to the wrong server or bounce entirely.
⚠️ Important: Only do this if you are sure you want to move your email to KaiMail. Removing MX records will stop email delivery to your previous provider.
Step 3: Add the KaiMail MX Record
Create a new MX record with the following values:
| Field | Value |
|---|---|
| Type | MX |
| Host / Name | @ |
| Value / Points to | mail.kaimail.net |
| Priority | 10 |
| TTL | 3600 (or default) |
Field-by-field explanation
- Type — Select
MXfrom the record type dropdown. - Host / Name — Enter
@to apply the record to your root domain. Some providers want you to leave this blank or enter your domain name instead — all three mean the same thing. - Value / Points to — This is the mail server that will receive your email. Enter
mail.kaimail.net(without a trailing dot, unless your provider requires it). - Priority — Set to
10. This is a standard priority value. Lower numbers mean higher priority; since we only have one MX record, the exact number doesn't matter much —10is conventional. - TTL — Time To Live, in seconds.
3600(1 hour) is a good default. Some providers show this as a dropdown (e.g. "1 Hour"). If you can't change it, the default is fine.
Step 4: Save and Wait for Propagation
Save your changes. DNS propagation can take anywhere from a few minutes to 48 hours, though most changes take effect within 15–30 minutes.
Step 5: Verify Your MX Record
You can verify that your MX record is set up correctly using any of these methods:
Using the terminal
dig MX yourdomain.com +short
Expected output:
10 mail.kaimail.net.
Alternatively, with nslookup:
nslookup -type=MX yourdomain.com
Using online tools
If you don't have access to a terminal, use any free DNS lookup tool such as:
Search for your domain's MX record and confirm it points to mail.kaimail.net with priority 10.
You can also check the status of your MX record from your Routes settings after logging in to you KaiMail account using the Check MX button:
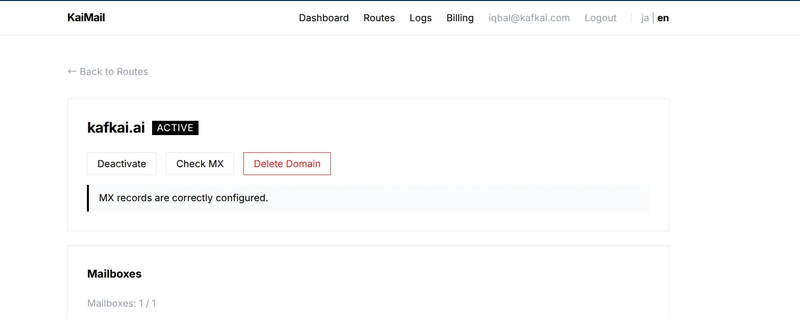
KaiMail Domain Settings – Active with Correct MX Records
Troubleshooting
"MX record not found" after saving
DNS propagation takes time. Wait 30 minutes and check again. If it still doesn't appear after a few hours, double-check that you saved the record and that you're editing the correct domain/zone.
Mail is still going to my old provider
You may have forgotten to remove the old MX records. If multiple MX records exist, mail servers will try all of them — potentially delivering some mail to the old provider. Remove all MX records except the KaiMail one.
My provider doesn't accept @ as a hostname
Some DNS panels expect a blank field or your full domain name (e.g. yourdomain.com) instead of @. Try leaving the field empty. Consult your provider's documentation if unsure.
My provider requires a trailing dot
Some providers require the MX value to be entered as mail.kaimail.net. (with a trailing dot). The trailing dot is technically correct in DNS notation and denotes a fully qualified domain name. Add it if your provider complains.
Optional: SPF Record
To improve email deliverability and reduce the chance of your emails being marked as spam, add an SPF record:
| Field | Value |
|---|---|
| Type | TXT |
| Host / Name | @ |
| Value | v=spf1 include:kaimail.net ~all |
| TTL | 3600 |
If you already have an existing SPF record (a TXT record starting with v=spf1), do not create a second one. Instead, merge them by adding include:kaimail.net before the ~all or -all in your existing record.
For example, if your current SPF record is:
v=spf1 include:_spf.google.com ~all
Change it to:
v=spf1 include:_spf.google.com include:kaimail.net ~all
That's it. Once your MX record is propagated, your domain is ready to receive email and forwarded through KaiMail.