Sending Email From Your Custom Domain Using "Send As"
If you have a custom domain — say, [email protected] — and you're using a forwarding service like KaiMail to receive your mail, you might be wondering: "How do I send emails from this address too?" After all, receiving letters is only half the job. Let's sort this out together.
The Problem: Two Halves of a Conversation
When you set up email forwarding with KaiMail, incoming messages to [email protected] get delivered neatly to your personal inbox — Gmail, Outlook, Yahoo Mail, whatever you prefer. That's the receiving half, and it works beautifully.
But when you hit "Reply" or "Compose" in that inbox, the message goes out as [email protected] (or whichever provider you use). The recipient sees your personal address, not your custom domain. It's like receiving a letter on beautiful company stationery, then replying on a scrap of notebook paper.
What we need is a way to send from [email protected] as well, so both sides of the conversation match. That's what the "Send As" feature does.
How It Works
Think of it this way. KaiMail is like a forwarding address — any mail that arrives for your custom domain gets rerouted to your regular mailbox. That handles incoming mail.
For outgoing mail, "Send As" tells your email provider: "When I send this letter, put my custom domain address on the envelope, not my personal one." Your provider uses its own postal route (SMTP server) to dispatch the message, but stamps it with the return address you chose.
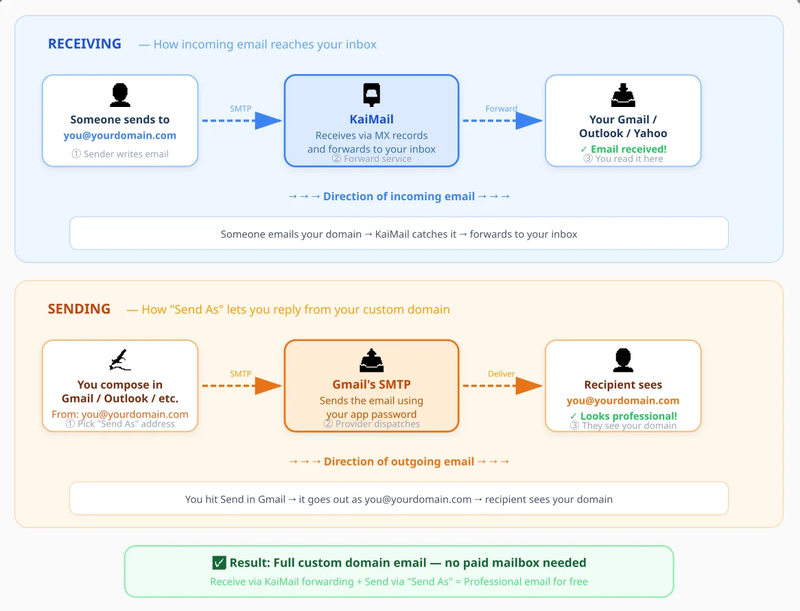
KaiMail "Send As" Email Settings & Workflow
The result? To everyone on the outside, it looks like all your mail — incoming and outgoing — comes from [email protected]. Clean and professional.
Before You Begin
You'll need three things:
- A custom domain with email forwarding already set up (through KaiMail or a similar service), so that incoming mail reaches your provider's inbox.
- A free email account with a provider that supports "Send As" — Gmail, Outlook.com, and Yahoo Mail all offer this.
- About ten minutes and a cup of tea.
A note about KaiMail: If you don't have email forwarding set up yet, KaiMail makes it easy to receive email at your custom domain. Point your domain's MX records to KaiMail, set up your forwarding address, and incoming mail will arrive in your existing inbox — no new email account needed. It's the quickest way to get a professional email address without the cost or complexity of a full mailbox.
Step-by-Step: Setting Up "Send As" in Gmail
Gmail is the most common choice, so let's walk through it first. The process is similar in other providers — I'll cover those afterward.
Step 1: Enable Two-Factor Authentication
Gmail requires two-factor authentication (2FA) before it will let you create app passwords. If you haven't enabled it yet, visit your Google Account security settings and turn it on. This is good practice anyway — think of it as putting a second lock on the post office door.
Step 2: Create an App Password
Once 2FA is active, you'll need to generate a special password for this connection. Go to your Google Account → Security → App Passwords (or search for "App Passwords" in your account settings). Give it a descriptive name — something like "Send As – yourdomain.com" — and click Create. Copy the generated password somewhere safe; you'll need it in a moment.
Step 3: Open Gmail's Account Settings
In Gmail, go to Settings (the gear icon) → See all settings → Accounts and Import tab. Under the section labeled "Send mail as", click "Add another email address".
Step 4: Enter Your Custom Domain Address
A small window will appear. Fill in:
- Name: The display name you want recipients to see (e.g., your full name or business name).
- Email address: Your custom domain address —
[email protected].
Uncheck "Treat as an alias" — this ensures replies to this address get handled properly.
Click Next Step.
Step 5: Configure the SMTP Settings
Here's where we tell Gmail how to send on your behalf. Enter the following:
| Field | Value |
|---|---|
| SMTP Server | smtp.gmail.com |
| Port | 587 |
| Username | Your full Gmail address (e.g., [email protected]) |
| Password | The app password you generated in Step 2 |
Make sure "Secured connection using TLS" is selected.
Click Add Account.
Step 6: Verify Ownership
Gmail will send a confirmation email to [email protected]. Since your forwarding is already set up through KaiMail, this verification message will arrive right in your Gmail inbox. Open it, copy the confirmation code, and paste it back into the verification prompt. You may also want to click the confirmation link in the email for good measure.
Step 7: Set It as Default (Optional)
Back in Settings → Accounts and Import → Send mail as, you'll now see your custom domain address listed. If you'd like all new emails to go out from this address by default, click "make default" next to it. Otherwise, you can choose which address to send from each time you compose a message — there will be a small "From" dropdown.
These Gmail help articles might help:
For Outlook.com (Hotmail) Users
Outlook.com also supports sending from a custom address, though the path is slightly different.
- Go to Settings (gear icon) → View all Outlook settings → Email → Sync email.
- Under "Send and receive email from a different address", select "Add a send-only address" or "Other email account".
- Enter your custom domain address and configure with your provider's SMTP settings.
- Complete the verification step.
The SMTP server and credentials will depend on which provider account you're authenticating with. Consult your email provider's SMTP documentation for the correct values.
This help article for Outlook might help:
For Yahoo Mail Users
Yahoo Mail offers a similar feature under a different name:
- Go to Settings → More settings → Mailboxes.
- Add your custom email address.
- Enter the SMTP server details and authenticate.
- Complete verification.
These help articles for Yahoo Mail might help:
- Add, delete, or edit a send-only address in New Yahoo Mail
- Add, delete, or edit a send-only address in Yahoo Mail
For Desktop Email Clients
If you use a desktop client like Thunderbird, Apple Mail, or a mobile mail app, the concept is the same — you add your custom domain address as a sending identity and point it at an SMTP server with valid credentials. Most clients make this straightforward under their account or identity settings.
A Word About Authentication
When you send through Gmail's SMTP servers using this method, the message is authenticated by Gmail — meaning SPF and DKIM will reflect Gmail's infrastructure rather than your custom domain. For personal use and small-scale sending, this works well and most recipients won't notice or mind.
If you find that you need full domain-level authentication (your own SPF, DKIM, and DMARC all aligned to your domain), that's when you'd look into a dedicated SMTP sending service. But for most people getting started with a custom domain, the "Send As" approach is a perfectly good first step.
Troubleshooting
"Authentication failed" when adding the account Double-check that two-factor authentication is enabled and that you're using the app password — not your regular account password. App passwords are usually 16 characters with no spaces.
Verification email not arriving Make sure your domain's MX records are properly configured and that forwarding is active. You can test by sending a regular email to your custom address first.
Emails landing in spam when sent via "Send As" This can happen because the sending domain (Gmail, Outlook, etc.) doesn't perfectly match your custom domain in authentication checks. For occasional correspondence, this is rare. If it becomes a pattern, consider adding your email provider to your domain's SPF record or exploring a dedicated SMTP service.
🚨 KaiMail is NOT related to any of the email providers above which we used as examples. If you feel unsure about setting up "Send As" yourself, we suggest you get in touch with the provider and ask for help.
Take your time with each step. Get it right. Once it's set up, you'll have a complete professional email setup — receiving through KaiMail, sending through "Send As" — and you won't have to think about it again. The mail will flow just as it should.