 Hasan Muhtadi Noor Rafid
How to Connect KaiMail to Zapier: Automate Incoming Emails with Webhooks
A no-code guide to connecting KaiMail's incoming email webhook to Zapier
KaiMail forwards incoming emails to any URL as structured JSON. Zapier triggers workflows from any incoming webhook. Put the two together and you can automate almost anything that happens when an email lands at your custom domain: log new leads to a spreadsheet, ping your team on Slack, open a support ticket, or push the data into your CRM.
This guide walks through the setup end to end. No code required, and you can be up and running in about ten minutes.
What You Can Build
A few automations people set up with KaiMail + Zapier:
- Lead capture: every email to
[email protected]becomes a new row in Google Sheets or a contact in HubSpot. - Support ticketing: every email to
[email protected]open a ticket in Zendesk, Freshdesk, or Linear. - Team alerts: get a Slack or Discord ping when someone emails
[email protected]. - CRM enrichment: every reply to a campaign address updates the matching contact in Salesforce, Pipedrive, or Airtable.
- Document workflows: attachments to
[email protected]get saved to Google Drive or Dropbox automatically. - AI triage: pipe incoming email through OpenAI or Claude to summarize, classify, or auto-respond.
Anything Zapier can do, you can now trigger from an email.
What You'll End Up With
An automated pipeline that looks like this:
- Someone sends an email to
[email protected]. - KaiMail receives it and POSTs the full email: headers, body, attachments as JSON to Zapier.
- Zapier runs whatever actions you've configured: notifications, database writes, API calls, AI prompts, you name it.
It's real-time: there's no polling delay. The Zap fires the moment the email arrives.
Prerequisites
Before you start, make sure you have:
- A KaiMail account on the PLUS plan or above. Webhook delivery is available on PLUS, PRO, and BUSINESS; it's not included on the BASIC (free) plan. Compare plans here.
- A custom domain configured in KaiMail with MX records pointing at KaiMail. If you haven't done this yet, add your domain in the dashboard and follow the on-screen DNS setup steps.
- A Zapier account. The free plan is enough for a single-step Zap (trigger + one action). You'll want a paid Zapier plan for multi-step workflows, filters, or the Code step used in the optional signature-verification section below.
Step 1: Create a Catch Hook Trigger in Zapier
First, set up the Zapier side so you have a URL to give KaiMail.
- Log in to Zapier and click Create a Zap
- In the trigger search box, type "Webhooks by Zapier" and select it.
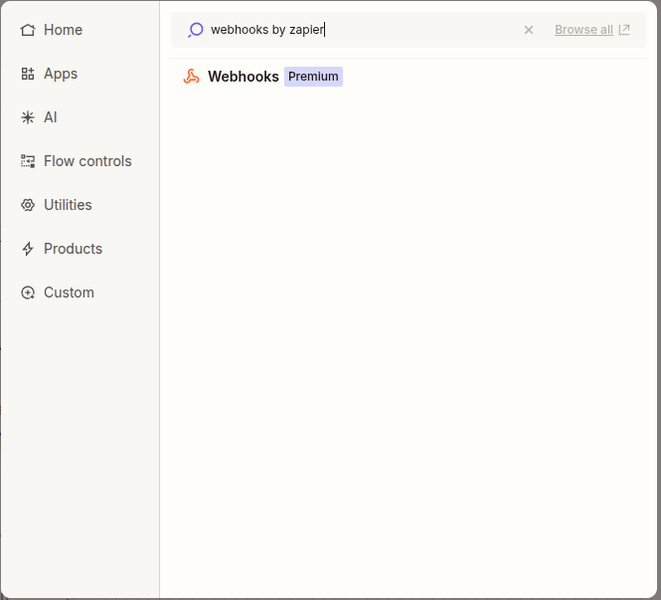
- For the trigger event, choose Catch Hook and click Continue.
- You can skip the "Pick off a Child Key" step, leave it blank and click Continue.
- Zapier now shows you a custom webhook URL. It looks like
https://hooks.zapier.com/hooks/catch/123456/abcdef/. Copy this URL — you'll paste it into KaiMail in the next step.
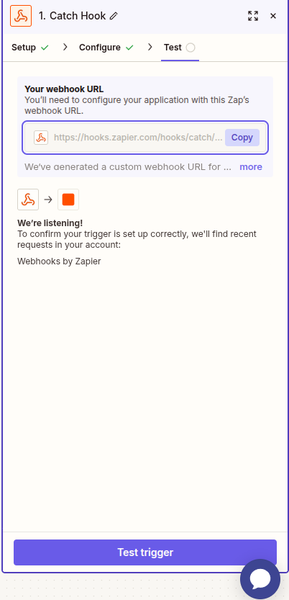
Keep the Zapier editor open. You'll come back to test the trigger after configuring KaiMail.
Step 2: Configure a Webhook Mailbox in KaiMail
Now point a KaiMail mailbox at that Zapier URL.
- Log in to the KaiMail dashboard and go to Routes.
- Click on the domain you want to use (e.g.
yourdomain.com).
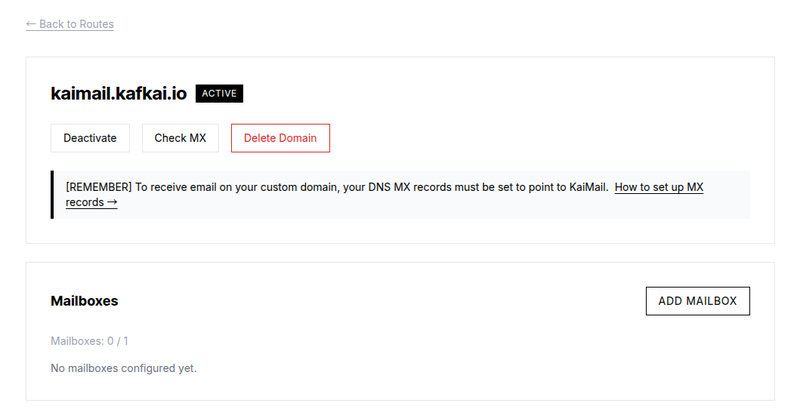
- Click Add Mailbox.
- Fill in the form:
- Email address: Enter the local part you want (e.g.
zapier,notifications, orsupport). The full address will be[email protected]. - Route Type: Select Webhook.
- Webhook URL: Paste the Zapier Catch Hook URL you copied in Step 1.
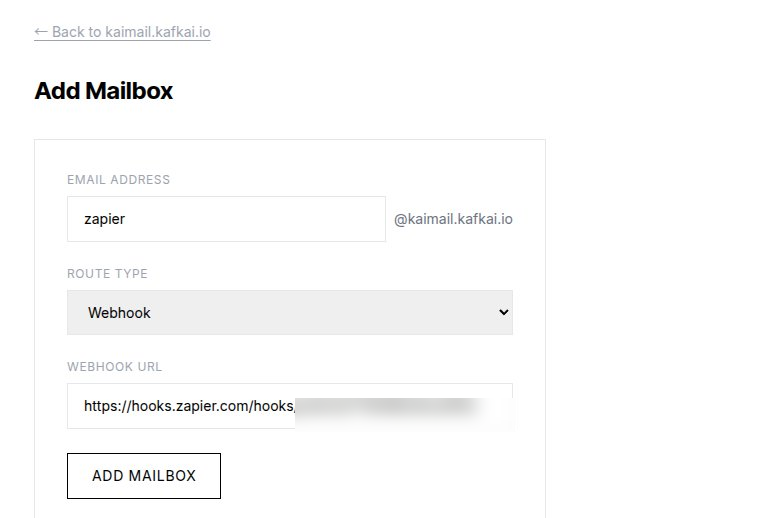
- Click Add Mailbox.
That's it on the KaiMail side. Every email sent to this address will now be POSTed to Zapier as JSON.
Tip: If you want to verify webhook signatures later (see the optional section near the end of this guide), click Edit on the mailbox to reveal its Webhook Signing Secret and copy it somewhere safe. You don't need it for basic Zapier use.
Step 3: Send a Test Email and Verify
Send a real email to your new mailbox address to confirm everything is connected.
- From any email client (Gmail, Outlook, your phone), send an email to your new address. Use a recognizable subject like "Zapier test" so it's easy to spot.
- Go back to the Zapier editor. Click Test trigger.
- Zapier will show the data it received from KaiMail. You should see fields like:
headers__Subject: your email's subject lineheaders__From: the sender's addressbody_text: the plain text bodybody_html: the HTML body (if any)envelope__sender: the SMTP envelope senderaccount__domain: your custom domain
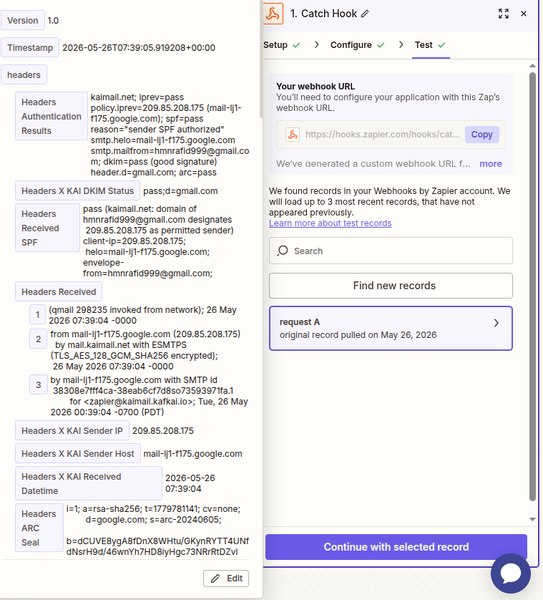
Note: Zapier flattens nested JSON keys with double underscores. So
headers.Subjectin KaiMail's JSON becomesheaders__Subjectin Zapier. This is normal.
If Zapier shows "We couldn't find a request," wait a minute and try again; the email may still be in transit. If it still doesn't appear, double-check that your MX records are pointed at KaiMail and that the mailbox is set to the Webhook route type.
Step 4: Add an Action
Now that the trigger works, add an action: the thing Zapier does when an email arrives.
How Field Mapping Works in Zapier
This applies to every Zapier action and is the part most people get wrong on their first try: Zapier does not auto-fill action inputs from your trigger data, even if the names match. You have to insert each value explicitly using the data picker.
For every input field in an action's configuration:
- Click inside the input (or click the
+button on the right edge). - A dropdown opens, showing data from earlier steps grouped by step number.
- Expand "1. Catch Hook in Webhooks by Zapier".
- Click the field you want. It gets inserted as a colored pill (a token); not as literal text.
Gotcha: If you leave inputs blank, Zapier will still run the action and report success. It just writes empty values. A "successful" test that produces an empty Slack message or an empty spreadsheet row almost always means you forgot to insert the pills.
Click the + below the trigger to add an action step. Below are two common examples.
Example: Log to Google Sheets
Before you start in Zapier, create the Google Sheet you want to log into. In the first row, add column headers that match the KaiMail fields you plan to capture. For example envelope__sender, headers__Subject, body_text, timestamp. The header names just need to be readable; you can use anything you like.
Then in Zapier:
- Search for Google Sheets and select it.
- Choose Create Spreadsheet Row as the action event.
- Connect your Google account.
- In the Configure tab:
- Drive: pick the Google Drive that holds the sheet.
- Spreadsheet: pick the sheet you just created.
- Worksheet: pick the tab (usually
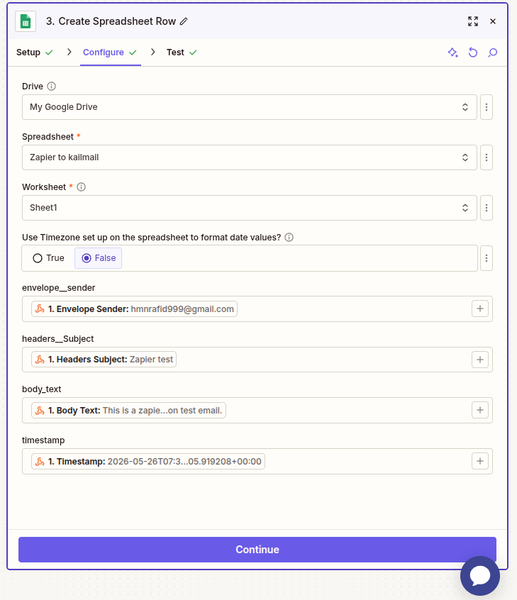
Sheet1). - Zapier now reads your column headers and shows one input field per column. Each input asks "what value should I write into this column?" — you have to fill them in. For each input, use the
+data picker to insert the matching KaiMail field from the trigger. Recommended mapping:
| Column header / input | Insert from trigger |
|---|---|
envelope__sender |
envelope__sender |
headers__Subject |
headers__Subject |
body_text |
body_text |
timestamp |
timestamp |
Even though the column header and the trigger field have identical names, you still have to insert the pill manually. Zapier won't auto-match them.
When done, your Configure panel should look like this; each of the four inputs shows a colored pill containing the real value pulled from your test email:
- Click Continue and then Test step. Open your sheet; a new row should appear with the real sender, subject, body, and timestamp from your test email. If the row is empty, go back to the Configure tab and check that each input contains a colored pill (not blank, not literal text).
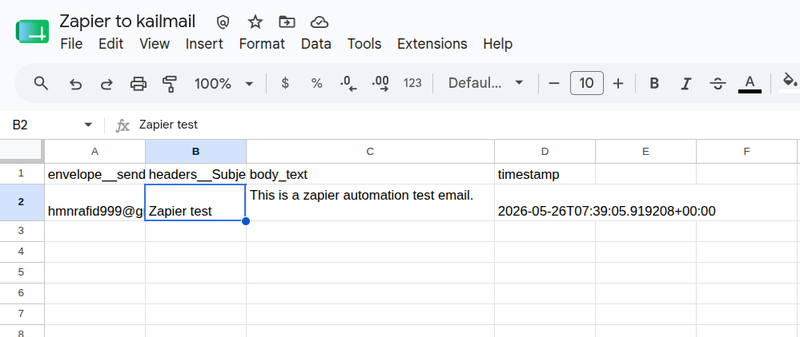
That's the moment of truth; every email to your KaiMail webhook mailbox will now flow into this spreadsheet automatically once you turn the Zap on.
Another Example Worth Trying: Send a Slack Notification
- Search for Slack and select it.
- Choose Send Channel Message as the action event.
- Connect your Slack account if you haven't already.
- In the Configure tab:
- Channel: pick the Slack channel to post in.
-
Message Text: click into the message box, then use the
+data picker to insert KaiMail fields between your static text. The end result should look like this in the editor, where each highlighted name is an inserted pill (not typed text):New email from {envelope__sender} Subject: {headers__Subject} Body: {body_text} -
Click Continue and then Test step. A real Slack message should appear in the channel within a few seconds.
Step 5: Turn On Your Zap
Once you've tested successfully:
- Click Publish (or toggle the Zap to On).
- Your Zap is now live. Every email to your KaiMail webhook mailbox will automatically trigger the workflow.
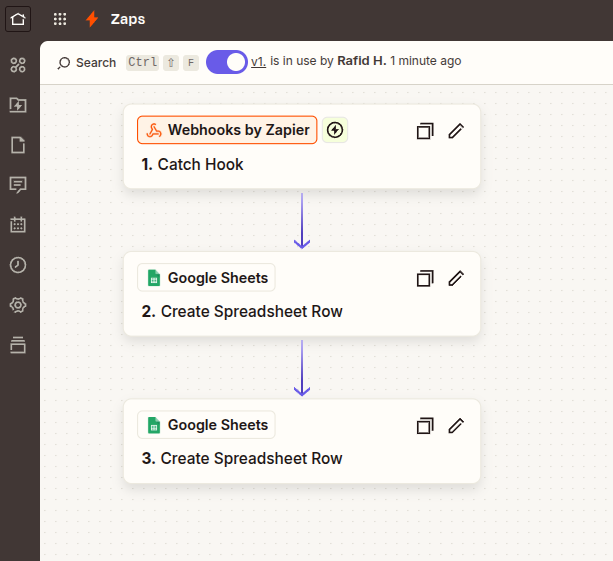
Send another test email to confirm the full end-to-end flow works in production.
KaiMail Webhook Field Reference
When mapping fields in Zapier, here's what each KaiMail field contains:
| Zapier field name | Description |
|---|---|
version |
Payload schema version (currently 1.0) |
timestamp |
ISO 8601 timestamp of when the email was processed |
headers__From |
Sender's email address (from the From: header) |
headers__To |
Recipient address (from the To: header) |
headers__Subject |
Email subject line |
headers__Date |
Date the email was sent |
body_text |
Plain text body, or empty if the email is HTML-only |
body_html |
HTML body, or empty if the email is plain text only |
attachments |
List of attachments, each with filename, content_type, size, and a download url (valid for 24 hours) |
envelope__sender |
SMTP envelope sender (MAIL FROM) — the actual sending address |
envelope__recipient |
SMTP envelope recipient (RCPT TO) — your mailbox address |
account__email |
Your KaiMail account email |
account__domain |
The custom domain that received the email |
account__mailbox |
The specific mailbox address |
metadata__authentication_results |
SPF, DKIM, and ARC verification results |
On attachments: KaiMail provides attachment download URLs, not inline file data. The URLs are signed and expire after 24 hours. If your Zap needs to save attachments (e.g. to Google Drive), make sure the action runs promptly.
Optional: Verify Webhook Signatures
KaiMail signs every webhook payload with HMAC-SHA256 so you can verify it wasn't tampered with. The signature is sent in the X-KAI-Webhook-Signature HTTP header, formatted as sha256=<hex digest>.
For basic Zapier use, you don't need to verify signatures. The Catch Hook URL is unique and unguessable. But if you're processing sensitive data and want an extra layer of security, you can verify the HMAC-SHA256 signature with a Code by Zapier step (requires a paid Zapier plan).
A note on the tradeoff: signature verification needs the exact raw bytes of the payload, which means switching the trigger from Catch Hook to Catch Raw Hook. Catch Raw Hook gives you the whole body as a single rawBody field instead of pre-parsed headers__Subject, body_text, etc., so you'll do a small amount of JSON parsing yourself.
Setup:
- Change the trigger to Webhooks by Zapier → Catch Raw Hook (the URL stays the same).
- Add a Code by Zapier step after the trigger and choose Run Javascript.
- Set up input data:
signature→ map toheaders__x_kai_webhook_signature(Zapier lowercases and underscores HTTP headers)payload→ map torawBodyfrom the Catch Raw Hook triggersecret→ paste your webhook signing secret from the KaiMail mailbox edit page- Use this code to verify and re-parse the email JSON for downstream steps:
const crypto = require('crypto');

const expected = 'sha256=' + crypto
  .createHmac('sha256', inputData.secret)
  .update(inputData.payload)
  .digest('hex');

if (expected !== inputData.signature) {
  throw new Error('Invalid webhook signature');
}

const email = JSON.parse(inputData.payload);

output = [{
  verified: true,
  subject: email.headers.Subject,
  from: email.headers.From,
  body_text: email.body_text,
  envelope_sender: email.envelope.sender,
  account_domain: email.account.domain,
}];
The fields you return from this Code step (subject, from, etc.) become available as inputs in any downstream action step.
For more details on webhook payloads and signatures, see the KaiMail webhook documentation.
Troubleshooting
"Webhook" doesn't appear in the Route Type dropdown Webhook delivery requires a KaiMail PLUS, PRO, or BUSINESS plan. If you're on the BASIC plan, you'll only see the Email Forward option. Upgrade your plan to enable webhooks.
Zapier says "We couldn't find a request"
Make sure you've sent an email to the exact mailbox address (e.g. [email protected]) after setting up the Catch Hook. Check that your domain's MX records point to KaiMail and that the mailbox is active (not paused).
Zapier shows the data but fields are empty
If body_text is empty, the email might be HTML-only. Check body_html instead. If headers__Subject is missing, the sender may not have included a subject line.
The action test reports success, but my Slack message / Google Sheet row is blank
You forgot to insert the data pills into the action's input fields. Zapier doesn't auto-map trigger data into matching action inputs — you have to click into each input and use the + data picker to insert the value from the trigger as a pill. See "How Field Mapping Works in Zapier" in Step 4.
The Zap only runs once (free plan limitation) Zapier's free plan only supports 2-step Zaps (one trigger + one action) and 100 tasks per month. If you need multiple actions, filters, or higher volume, you'll need a paid Zapier plan.
Attachment URLs don't work Attachment download URLs expire after 24 hours. If your Zap is delayed or you're testing with old trigger data, the URLs may have expired. Send a fresh test email.
Where to Go From Here
A few ways to extend what you just built:
- Add filters: use Zapier's "Filter" step to only run for emails matching certain senders, subjects, or domains.
- Chain multiple actions: log to a spreadsheet and notify Slack and create a CRM contact from the same email.
- Run it through AI: add an OpenAI or Claude step to summarize the email, extract structured data, or auto-draft a reply before passing it on.
- Spin up more mailboxes:
sales@,support@, andbilling@can each point at a different Zap. KaiMail's PLUS plan includes multiple custom mailboxes; PRO and BUSINESS scale that up substantially. - Send replies through KaiMail: paid plans also support outbound SMTP from your custom domain (port 587, STARTTLS). Pair it with Zapier's SMTP action to close the loop and reply from the same address.
Wrap Up
You've now got a real-time bridge between any incoming email on your custom domain and the Zapier ecosystem. No servers to run, no code to maintain, and no third-party email parser sitting in front of your domain. The same webhook payload that Zapier consumes here also works with n8n, Make, your own backend, or anywhere else you can accept an HTTP POST, so you're never locked in.
If you build something interesting, we'd love to hear about it. Drop us a note at [email protected].
KaiMail is a developer-first email forwarding service for custom domains. Receive, route, and send emails on your own domain with webhook delivery, SMTP submission, DKIM signing, and a clean dashboard. Get started free — no credit card required.